Configuring the Salesforce.com Integration
The Salesforce.com integration was first introduced in Neurons for ITSM Release 2015.2 as an optional feature. The feature has been enhanced in Neurons for ITSM Release 2016.1.
•About the Salesforce.com Integration
•Setting Up the Salesforce.com System
•Installing the SalesForce.com Integration in Ivanti
•Additional Ivanti Information
•Additional Salesforce.com Information
About the Salesforce.com Integration
About the Integration
The Salesforce.com integration is an optional integration. This integration allows you to synchronize contacts and accounts between Salesforce.com and Neurons for ITSM. There are three supported mechanisms in this integration:
•You can do a bulk import of accounts and contacts from Salesforce.com to Neurons for ITSM to initially synchronize the two systems.
•You can configure Salesforce.com to send updates to Neurons for ITSM when new accounts and contacts are created or existing ones are updated.
•Neurons for ITSM can update Salesforce.com contacts when modified through a quick action. You can call the quick action manually or configure a workflow to automate the quick action, depending on whether you want all updates to Neurons for ITSM contacts to be reflected back to Salesforce.com.
You must configure both Neurons for ITSM and Salesforce.com to enable this integration. Additional Ivanti Information describes changes to Neurons for ITSM to support importing records, to receive the notifications of changes from Salesforce.com, and to be able to send updates to Salesforce.com. Setting Up the Salesforce.com System describes how to configure Salesforce.com to notify Neurons for ITSM when an account or contact is created or edited.
Prerequisites
To use the Salesforce.com integration, you must have originally installed Neurons for ITSM Release 2013.2 or later on your application. If you originally installed an earlier version of Neurons for ITSM and then upgraded to Neurons for ITSM Release 2013.2 or later, the Salesforce.com integration will not work.
You must have the following components installed and running on your Neurons for ITSM application for the Salesforce.com integration to work:
•Message queue
•Integration service
•Workflow service
Setting Up the Salesforce.com System
•Getting Ready to Configure the Salesforce.com System
•Creating or Resetting the Security Token
Getting Ready to Configure the Salesforce.com System
•Before you begin, you must have a valid Salesforce.com account. If you do not have one, you can create a developer account in Salesforce.com for testing purposes. Go to https://developer.salesforce.com/signup to create the account.
•You must copy and paste the link above. You cannot click on it to launch it as it does not work correctly when you click on it.
•If you are installing the Salesforce.com integration into a sandbox organization you must replace the initial portion of the URL with http://test.salesforce.com.
Creating or Resetting the Security Token
1.Log into Salesforce.com. The application displays the Salesforce.com home page.
2.At the top of the page, click the down arrow next to your name and select either Setup or My Settings.
3.From the left panel, do one of the following:
•If you clicked Setup, select My Personal Information > Reset My Security Token.
•If you clicked My Settings, select Personal > Reset My Security Token.
4.Click Reset Security Token. Salesforce.com emails you a new security token. Keep this email.
Creating a Remote Site
1.Log into Salesforce.com. The application displays the Salesforce.com home page.
2.Click Remote Site Settings. Salesforce.com displays the All Remote Sites page.
3.Create a new remote site by clicking New Remote Site. Salesforce.com displays the Remote Site Edit page.
4.Enter information into the fields.
| Field | Description |
|---|---|
| Remote Site Name | The name of the new remote site. For example, enter HEATTarget. |
| Remote Site URL | The URL of the new remote site. For example, enter https://mycompany.saasit.com. |
| Disable Protocol Security | Disables security for the new remote site. Leave unchecked. |
| Description | An optional description. |
| Active | Specifies if the new remote site is active. Check this option. |
5.Click Save.
Installing the SalesForce.com Integration in Ivanti
•About Configuring the Settings in Ivanti
•Verifying the External Contact Business Object
•Configuring the Salesforce.com External Contact Layout
•Configuring the Salesforce.com Account Layout
•Adding the Salesforce.com Configuration to Ivanti
•Specifying Trusted IP Addresses
•Updating the CreateSFContact Quick Action
•Updating the Salesforce.com Connector
•Editing the Outbound Messages
•Customizing the Salesforce.com Form
About Configuring the Settings in Ivanti
You can import data from Salesforce.com into Neurons for ITSM by importing a .CSV file using the Neurons for ITSM data import tool (as described in Data Import Connections). There are connectors created already in Neurons for ITSM for importing account and contact data. These connections are called Account Import and Contact Import.
The subsequent data flow between Neurons for ITSM and Salesforce.com is bi-directional. From the Salesforce.com side, any new accounts or contact business objects and succeeding updates on either business object triggers a web service call to insert or update into Neurons for ITSM. From the Neurons for ITSM side, any update on an existing contact triggers a Neurons for ITSM workflow where a quick action calls the Salesforce.com web service to update the corresponding contact in Salesforce.com.
Verifying the External Contact Business Object
You must verify and remove certain required attributes in some of the fields in the External Contact business object if the Primary Email and LoginID fields are required.
•Determining if the PrimaryEmail and LoginID Fields are Required
•Configuring the LoginID Field
•Configuring the PrimaryEmail Field
•Disabling the PrimaryEmail and LoginID Fields
Determining if the PrimaryEmail and LoginID Fields are Required
Follow these steps to determine if those fields are required:
1.From the Configuration Console, click Build > Business Objects.
2.Open the External Contact business object.
3.Click the Business Rules tab.
4.Click Required Rules.
5.Look at the rules. If the LoginID and PrimaryEmail fields are required, there are rules for them listed in this section.
Configuring the LoginID Field
If the LoginID field is required, do the following:
1.From the Configuration Console, click Build > Business Objects.
2.Open the FRS_CompositeContract_Identity business object.
3.Click the Fields tab.
4.Open the LoginID field.
5.Under the Field Attributes header, check Nullable.
6.Click the Indexes tab.
7.Open the UN_IdentityContract_Name index.
8.Add two new filters by doing the following:
| a. | Under the Filter Expression header, click the add filter  icon. icon. |
| b. | Under the Field heading, click not set. |
| c. | From the drop-down menu, select Login ID. |
| d. | Under the Filter Expression header, click the add filter icon. |
| e. | Under the Field heading, click not set. |
| f. | From the drop-down menu, select Login ID. |
| g. | Under the Operation heading, click NotNull. |
| h. | From the drop-down menu, select NotEquals. |
| i. | Under the Value heading, click not set. |
| j. | From the drop-down menu, enter ". |
9.Click Save.
Configuring the PrimaryEmail Field
If the Primary Email field is required, do the following:
1.From the Configuration Console, click Build > Business Objects.
2.Open the FRS_CompositeContract_Contact business object.
3.Click the Fields tab.
4.Open the PrimaryEmail field.
5.Under the Field Attributes header, check Nullable.
6.Click the Indexes tab.
7.Open the UN_ContactContract_Email index.
8.Add two new filters by doing the following:
| a. | Under the Filter Expression header, click the add filter icon. |
| b. | Under the Field heading, click not set. |
| c. | From the drop-down menu, select PrimaryEmail. |
| d. | Under the Filter Expression header, click the add filter icon. |
| e. | Under the Field heading, click not set. |
| f. | From the drop-down menu, select PrimaryEmail. |
| g. | Under the Operation heading, click NotNull. |
| h. | From the drop-down menu, select NotEquals. |
| i. | Under the Value heading, click not set. |
| j. | From the drop-down menu, enter ". |
9.Click Save.
Disabling the PrimaryEmail and LoginID Fields
1.From the Configuration Console, click Build > Business Objects.
2.Open the External Contact business object.
3.Click the Business Rules tab.
4.Click Required Rules.
5.If the LoginID and PrimaryEmail fields are required, disable them by clicking the On  icon under the Status column for each field.
6.Click Save.
Configuring the Salesforce.com External Contact Layout
1.From the Configuration Console, click Build > Business Objects.
2.Open the External Contact business object.
3.Click the Layouts tab.
4.Open the Profile.ExternalContact layout.
5.Under the Views in this layout section, click formView.
6.Ensure that you are not in the Try our new look! view. (If you see a link on the top right that says Switch to old view, click it.)
7.In the Main Form field, select Profile.ExternalContact_Salesforce.
8.Click Save.
Configuring the Salesforce.com Account Layout
1.From the Configuration Console, click Build > Business Objects.
2.Open the Account business object.
3.Click the Layouts tab.
4.Open the Account.Layout layout.
5.Under the Views in this layout section, click formView.
6.Ensure that you are not in the Try our new look! view. (If you see a link on the top right that says Switch to old view, click it.)
7.In the Main Form field, select Account.Form_Salesforce.
8.Click Save.
Adding the Salesforce.com Configuration to Ivanti
If your application does not have a Salesforce.com configuration, create one by following these steps:
1.Log into the Service Desk Console.
2.Open the Salesforce Configuration workspace.
3.Click New Salesforce Configuration.
4.Enter information into the fields.
| Field | Description |
|---|---|
| Record Identifier | This field is automatically populated. It is the RecID for this configuration. |
| WSDL Address | The WSDL address. Enter Salesforce/enterprise.wsdl. |
| Salesforce URL | The Salesforce URL. Enter https://login.salesforce.com/services/Soap/c/33.0. |
| Salesforce User ID | The account used to log into Salesforce.com. |
| Salesforce Password |
The password associated with the Salesforce user ID. You must enter the security token at the end of the password.
Note: You must enter the security token at the end of the password. If you do not enter it, the application does not accept the password. |
5.Click Save.
Specifying Trusted IP Addresses
Specify three trusted host ranges. Check https://help.salesforce.com/apex/HTViewSolution?id=000003652 for a list of all of the published Salesforce IP addresses. The following IP ranges are for the American registry:
•Name: SF1, starting IP: 96.43.144.0, ending IP: 96.43.159.254
•Name: SF2, starting IP: 136.146.0.0, ending IP: 136.147.255.254
•Name: SF3, starting IP: 204.14.232.0, ending IP: 204.14.239.254
Follow these steps to specify a trusted host range:
1.Log into the Service Desk Console.
2.Open the Integration Trusted Host workspace.
3.Click New Integration Trusted Host.
4.Enter information into the fields.
| Field | Description |
|---|---|
| Name | A unique name for this trusted host. |
| Description | (Optional). A description of this trusted host. |
| Start IP | The first IP address in a series of IP addresses to allow. |
| End IP | The last IP address in a series of IP addresses to allow. |
5.Click Save.
Updating the CreateSFContact Quick Action
The External Contact business object has a workflow for the outbound flow from Neurons for ITSM to Salesforce.com. You implement a quick action from within the workflow. The quick action calls the Salesforce.com web service to update an existing contact record.
Before you begin, go to the Service Desk Console and open the Salesforce.com configuration that you added in Adding the Salesforce.com Configuration to Ivanti. Make a note of the RecID.
You need to add the RecID to the quick action. Follow these steps:
1.From the Configuration Console, click Build > Automation Tools > Quick Actions.
2.For the ExternalContact quick action, click Add/Edit next to it.
3.In the quick action editor, click the Your Actions tab and click CreateSFContact.
4.Make a note of the connection name. By default, it is called CreateSFContact.
5.From the Configuration Console, click Extend > Integration Tools > Web Service Connections (BETA) to open the Web Service Connections (BETA) workspace.
6.Under the Calls from Ivanti to external web services (outgoing) section, view the script called CreateSFContact_ExternalContact.
7.On the Integration Script field, under the Scripts heading, in the line that starts with var sfConfig = Get("Frs_def_integration_sfdc_config#", enter the RecID at the end. The line should look like this: var sfConfig = Get("Frs_def_integration_sfdc_config#",RecID).
8.Click Save.
Updating the Salesforce.com Connector
Before you begin, go to the Service Desk Console and open the Salesforce.com configuration that you added in Adding the Salesforce.com Configuration to Ivanti. Make a note of the RecID.
You need to modify some of the settings of the Salesforce.com connector to make it compatible for your application.
1.From the Configuration Console, click Extend > Integration Tools > Web Service Connections (BETA) to open the Web Service Connections (BETA) workspace.
2.Under the Calls from external web services to System (incoming) section, click the edit  icon next to HEAT Salesforce Connection.
3.Click Next.
4.For the SF Contact Reference service reference, in the Scripts area, ensure that this line exists: var sfConfig = Get("Frs_def_integration_sfdc_config#","RecID").
5.For the SF Account Reference service reference, in the Scripts area, ensure that this line exists: var sfConfig = Get("Frs_def_integration_sfdc_config#","RecID").
6.Click Save.
7.Go back to the Web Service Connections (BETA) workspace.
8.Click the expand icon next to the Ivanti Salesforce Connection entry. The application displays the associated service references.
9.Click the edit icon next to the SF Contact Reference service reference. The application displays the Edit Service Reference dialog box.
10.For the Service Address (URL) field, enter the URL of the Neurons for ITSM Application Server. An example is https://HEAT_SM_Server:Port/Tenant_URL/UpdateContact.asmx.
11.Click Save.
12.Repeat steps 8 to 11 for the SF Account Reference service reference, entering the URL https://HEAT_SM_Server:Port/Tenant_URL/UpdateAccount.asmx.
Adding an API Key
You need an API key for the outbound messages, described in Editing the Outbound Messages. Create the API key by doing the following:
1.From the Configuration Console, click Configure > Security Controls > API Keys to open the API Keys workspace.
2.From the Key groups section, click Add Key Group.
3.For the Name field, enter Dynamic Web Services.
4.Click Save Key Group.
5.Click Back.
6.Under the Key groups header, highlight Dynamic Web Services.
7.Click Add API Key. The application displays the New API Key page.
8.Click Save Key.
9.Click Back. The application displays the new API key.
10.Make a note of the API key.
Editing the Outbound Messages
1.Log into Salesforce.com. The application displays the Salesforce.com home page.
2.At the top of the page, click the down arrow next to your name and select Setup.
3.From the left panel, click Build > Create > Workflow & Approvals > Outbound Messages. The application displays two outbound messages.
4.Click Edit to edit the first outbound message.
5.Update the value for the Endpoint URL parameter to match the value from Neurons for ITSM. Be sure to update the API key portion of the endpoint URL. See Updating the Salesforce.com Connector for the API key.
6.Click Edit to edit the second outbound message.
7.Update the value for the Endpoint URL parameter to match the value from Neurons for ITSM. Be sure to update the API key portion of the endpoint URL. See Updating the Salesforce.com Connector for the API key.
Customizing the Salesforce.com Form
1.From the Configuration Console, click Build > Business Objects.
2.Open the External Contact business object.
3.Click the Forms tab.
4.Open the form to use to display the contact details. For example, open the Profile.ExternalContact form.
5.Modify the form to add or rearrange the fields for the Salesforce.com contact data listed below:
•AccRecId
•ContactOwner
•ReportsTo
•Fax
•OtherStreet
•OtherCity
•OtherState
•OtherZip
•OtherCountry
•OtherPhone
6.Click Save.
7.From the Configuration Console, click Build > Business Objects.
8.Open the Account business object.
9.Click the Forms tab.
10.Open the form to use to display the account details. For example, open the Account.Form form.
11.Modify the form to add or rearrange the fields for the Salesforce.com account data listed below:
•SFAccountOwner
•AccountSite
•Industry
•Type
•URL
•ShippingAddress
•ShippingCity
•ShippingZip
•ShippingState
•ShippingCountry
12.Click Save.
Additional Ivanti Information
•About the Workflow for an External Business Object
•About the Salesforce.com Web Service Connection
About the Workflow for an External Business Object
The External Contact business object has a workflow for the outbound flow from Neurons for ITSM to Salesforce.com. You implement a quick action from within the workflow. The quick action calls the Salesforce.com web service to update an existing contact record.
Do the following to find the script:
1.From the Configuration Console, click Extend > Integration Tools > Web Service Connections (BETA) to open the Web Service Connections (BETA) workspace.
Under the Calls from System to external web services (outgoing) section, the script is called Create SFContact_ExternalContact.
About the Salesforce.com Web Service Connection
To view the Salesforce.com web service connection, follow these steps:
1.From the Configuration Console, click Extend > Integration Tools > Web Service Connections (BETA) to open the Web Service Connections (BETA) workspace.
2.Under the Calls from external web services to System (incoming) section, click the edit icon next to HEAT Salesforce Connection.
The following is displayed in the Response XML (optional) field:
<soapenv:Envelope xmlns:soapenv="http://schemas.xmlsoap.org/soap/envelope/" xmlns:xsd="http://www.w3.org/2001/XMLSchema" xmlns:xsi="http://www.w3.org/2001/XMLSchema-instance">
<soapenv:Body>
<notificationsResponse xmlns="http://soap.sforce.com/2005/09/outbound">
<Ack>True</Ack>
</notificationsResponse>
</soapenv:Body>
</soapenv:Envelope>
Additional Salesforce.com Information
•About the Contact and Account Workflows
•Generating the Enterprise.WSDL API File
•Adding Files to the WSDL and Script Repository
About the Contact and Account Workflows
Salesforce.com has two workflows: one for the Contact object and one for the Account object. Follow these steps to view them:
1.Log into Salesforce.com. The application displays the Salesforce.com home page.
2.At the top of the page, click the down arrow next to your name and select Setup.
3.Click Build > Create > Workflow & Approvals > Workflow Rules.
4.Select the workflow to view, either Contact or Account.
Salesforce.com displays the Step 2: Configure Workflow Rule page with this information:
| Field | Description |
|---|---|
| Edit Rule | |
| Object | This value is prepopulated based on what you entered on the previous page. In this case, it is either Contact or Account. |
| Rule Name | The name of the workflow rule. |
| Description | An optional description. |
| Evaluation Criteria | |
| Evaluate the rule when a record is | Specifies when to evaluate the rule. |
| Rule Criteria | |
| Run this rule if the following | Specifies when to run this rule. |
| Insert Field | The field to evaluate. |
| Functions | Lists functions that you can enter into the Insert Field area. |
5.Click Next. Salesforce.com displays the Step 3: Specify Workflow Actions page.
Salesforce.com displays the Edit Outbound Message page with the following information:
| Field | Description |
|---|---|
| Name | The name of the outbound message. |
| Unique Name | A unique name for the outbound message. |
| Description | An optional description. |
| Endpoint URL |
The URL of the endpoint followed by ?APIKey= and a valid API key.
An example for the Contact object is https://mycompany.saasit.com/ frs-ctp-demo1/UpdateContact.asmx?APIKey= D6EFD03356CD41CAADDCF37443E33C61 and an example for the Account object is https://mycompany.saasit.com/ frs-ctp-demo1/UpdateAccount.asmx?APIKey= D6EFD03356CD41CAADDCF37443E33C61. |
| User to send as | The name of the user sending the outbound message. |
| Protected Component | Specifies if the component is protected. |
| Send Session ID | Specifies to send the session ID. |
| Contact fields to send | The fields to include in the outbound message. |
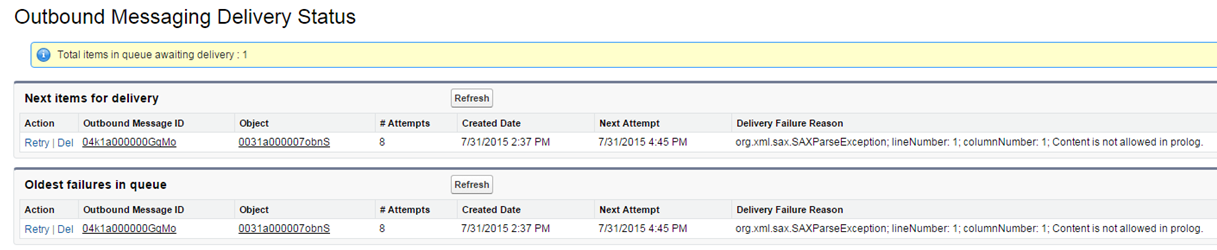
Monitoring Outbound Messages
Follow these steps to monitor the outbound messages:
1.Log into Salesforce.com. The application displays the Salesforce.com home page.
2.At the top of the page, click the down arrow next to your name and select Setup.
3.Select Monitor > Outbound Messages.
4.Verify that there are no delivery failures.
Outbound Message Delivery Failure
Generating the Enterprise.WSDL API File
The Salesforce.com package includes the Enterprise.WSDL file for Salesforce.com for the Neurons for ITSM integration.
If you modify the schema for the Account or Contact business objects from Salesforce.com, you must regenerate an updated WSDL from Salesforce.com. Follow the steps below to update the file after you regenerate it:
1.Log into Salesforce.com. The application displays the Salesforce.com home page.
2.At the top of the page, click the down arrow next to your name and select Setup.
3.From the left panel, click Build > Develop > API.
4.Click Generate Enterprise WSDL.
5.Save the Enterprise.WSDL file to a convenient location.
6.Open the Enterprise.WSDL file with a text editor.
7.Every time that you regenerate the Enterprise.WSDL file, you must add the xsd:attribute as shown below:
<complexType name="ListViewRecord">
<sequence>
<element name="columns"type="tns:ListViewRecordColumn" maxOccurs="unbounded"/>
</sequence>
<xsd:attribute name="tmp" type="xsd:string" />
</complexType>
Adding Files to the WSDL and Script Repository
In Neurons for ITSM Release 2016.1, we introduced a repository where you can store WSDL files and scripts. We recommend that you store the Salesforce WSDL files in the repository. Make sure that the name of the WSDL file that you add to the repository matches the name of the file in Salesforce.
Follow these steps to add a WSDL file to the repository:
1.From the Configuration Console, click Extend > Integration Tools > WSDL and Script Repository to open the WSDL and Script Repository workspace.
2.Click New File to add a WSDL file.
3.In the Type field, select WSDL.
4.Enter a name in the Name field.
5.Click Upload to upload the new WSDL file. Navigate to the file and click Open.
6.Click Save.